Kling Motion Control tutorial: animate a character with a reference video
Want your character to wave, turn its head or dance like a person in a video? Kling Motion Control uses an image for the character's appearance and a video for the movement. This guide walks you through a short gesture exercise, from preparing the files to generating and downloading your result.
The starting point
For a first attempt, pair a half-body character image with about five seconds of clear movement, keeping the person and hands in frame. Start with 720p and Match video. Leave scene details empty, generate once, then use the result to decide what to adjust.
On this page
Before you begin
- A character image with a clear face and room around the arms.
- A separate motion video. Start with about five seconds of continuous half-body movement, such as a wave. Use both files with permission.
- A SWRFlow account with enough credits. You can prepare the files before signing in; generation requires an account.
The goal: give your character a performer's gestures
Compare the heart gesture, raised hand and head movement with the reference inset.
The video at the upper left supplies the movement, the image at the lower left supplies the character, and the large panel shows the result. You will prepare the same two kinds of input: one still character image and one separate motion clip.
Use your own files to follow the workflow below. Start with a simple wave before trying a more involved performance. The comparison illustrates the effect; use a standalone motion clip when adding your reference.
Step 1: prepare an image and video with similar framing
Choose the motion clip first, then prepare a character image with similar framing. If the performer waves in a shot from the waist up, use an image that also shows the upper body. This gives the model appearance information for the body parts involved in the action.
- Character image: choose one clearly visible humanoid character, with space around the shoulders, arms and hands. Start without overlapping people, hands covering the face or intricate accessories.
- Motion video: trim a continuous performance to about five seconds. Keep the camera steady and the person clear, with the whole hand visible throughout the wave.
- Match the framing: use a half-body image for half-body movement and a full-body image for full-body movement. A close-up face cannot supply the appearance of legs needed for a walking shot. Trim the clip in a video editor before adding it.
| Input | Format and size | Dimensions or duration |
|---|---|---|
| Character image | JPEG, PNG or WebP; up to 10 MB | Short edge at least 340 px; long edge up to 3850 px; aspect ratio from 1:2.5 to 2.5:1. |
| Motion video | Regular MP4 or MOV; up to 100 MB | Match video supports 3–30 seconds; Match image supports 3–10 seconds. A five-second practice clip works with either setting. |
Step 2: add the two files separately
Open Kling Motion Control and find the two input boxes shown below. On desktop, the inputs are on the left and the result area is on the right. Before you generate, the result area displays a demonstration video.
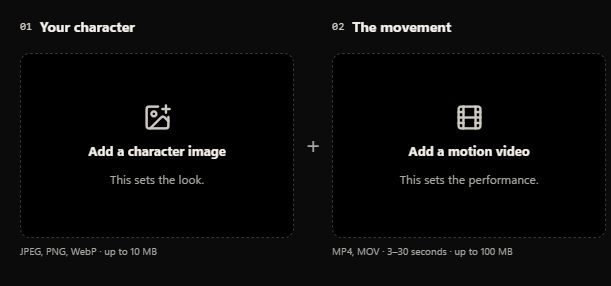
- Click “Add a character image” and select your prepared image. Check that the preview shows the character you want to use.
- Click “Add a motion video” and select your trimmed clip. Play the preview to check that its start and end include the action you want.
- Check the detected duration and credits below. If you chose the wrong file, use the remove button at the top right of that input box, then add the correct file.
Continue once both previews and the credit estimate appear. If a file is rejected, check its format, dimensions and duration against Step 1 first.
Step 3: choose quality, orientation and audio
| Control | Start with | Why |
|---|---|---|
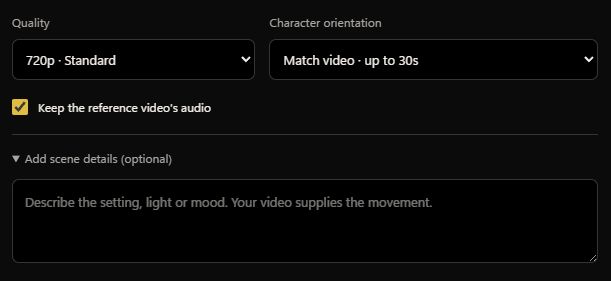
| Quality | 720p · Standard | Check the movement at a lower credit cost. Consider 1080p · Pro once you are happy with the motion and appearance. |
| Character orientation | Match video · up to 30s | The exercise follows the reference performance, so start by taking the character's orientation from the video. |
| Keep the reference video's audio | Check if you want the original sound; otherwise uncheck | Controls whether the reference audio is retained. Keeping it has no extra charge. |
| Add scene details (optional) | Leave empty for the first attempt | The video already supplies the movement. First see how the two references work together. |
Character orientation means the direction the character faces, not landscape or portrait format. Choose Match video to take that direction from the performance, or try Match image when the image's orientation matters more. For example, if your image faces forward but the performer faces partly sideways, decide which reference should guide the direction. Match image requires a clip between 3 and 10 seconds.
To add background or lighting details, expand “Add scene details (optional).” If your character image already shows a garden, you could start with the sentence below. Adapt it to your image; you do not need to describe every wave or head turn again.
Keep the garden background and soft daylight from the image, with natural colors.
How to adapt itAdapt the background and lighting to your character image, or leave this field empty if you have no extra requirements. Avoid adding actions that conflict with the reference video.
Step 4: check the credits for this run
Read the total above the generate button. SWRFlow uses 7 credits per second at 720p and 9 at 1080p, rounding the reference duration up to a whole second. An exactly five-second practice clip at 720p uses 35 credits; an 8.8-second clip is billed as nine seconds.
| Reference duration | 720p · Standard | 1080p · Pro |
|---|---|---|
| 5 seconds | 35 credits | 45 credits |
| 8.8 seconds | 63 credits | 81 credits |
| 10 seconds | 70 credits | 90 credits |
If the total is higher than expected, check for unnecessary footage before or after the action. Trim it and replace the video. Review the total again after changing the file or quality; if upload verification produces a revised quote, confirm it before submitting.
Step 5: generate, review and download
- Review the image, motion clip, settings and credits, then click “Generate motion video.” If you are signed out, the button says “Sign in to generate.” After signing in, check your draft and cost, then follow the page's instructions to continue.
- Wait for the current task in the result area. Keep the draft link. After a refresh or connection interruption, return to that draft in the same browser and use the query button in the result area to check the existing task.
- Play your completed video. Check that the character performs the wave, then inspect the face, outfit and hands. When you are satisfied, use the download button below the result.
For this exercise, check three moments: the character before the wave, the hand beside the face, and the appearance after the hand lowers. If the main movement is wrong, adjust the references first. Moving to 1080p does not guarantee a fix for motion or hand errors.
What should you change on the next attempt?
| Problem | Check first | Next adjustment |
|---|---|---|
| Fingers merge or hands distort | Hands covering the face, overlapping or moving too quickly | Use a slower reference with a clearer view of the hand. |
| Feet leave the frame or slide | A half-body image paired with full-body motion, or too little space around the feet | Use a full-body image with visible legs and feet and room around them. |
| Face, clothing or accessories change during a turn | A large rotation revealing parts not visible in the image | Try a smaller turn or simpler accessories. |
| The character faces an unexpected direction | Which reference Character orientation uses | With a 3–10-second clip, switch the orientation setting while keeping the references unchanged, then compare. |
| A file is rejected or no estimate appears | File specifications and the duration allowed by the selected orientation | Fix image dimensions or re-export MP4/MOV. Trim clips over 10 seconds or choose Match video. |
| The task still appears pending after a disconnect | The task status in the current draft | Use the query button in the result area before starting another generation. |
Next exercise: make a full-body character turn
Watch the turn timing, foot contact and bag as the character moves through the scene.
After the gesture exercise, try a full-body turning clip with a full-body character image. This example shows a turn transferred across different outfits and settings.
- Keep the character visible from head to toe, with room below the feet and on both sides.
- Start with a small turn, then try a larger rotation once the movement works.
- Check for sliding feet and changes to hands, bags and clothing during the turn. For product work, verify the product details separately.
Next exercise: add a head tilt or shoulder touch
Compare the shoulder touch, head tilt and hand-to-hair movement across two characters.
For a more expressive half-body performance, choose a reference with a head tilt, shoulder touch or raised hand. Leave space above the head and beside the shoulders in your character image so the hands have room to move.
Trim to one clear gesture and follow the same generation steps. Pause where the hand crosses the face or touches the hair. If that section distorts, try a gesture with less overlap. Once a single movement works, try a continuous performance with several gestures.
Questions
Do I have to write a prompt?
No. The character image and motion video are required, but scene details can be empty. Complete a basic run first, then add a description if you need to adjust the background, light or mood.
Can I upload one of the comparison videos above?
Use a standalone motion clip. The comparisons combine the reference, character image and result in one frame to illustrate the effect. Prepare your own two separate inputs to follow the guide.
How is this different from ordinary image-to-video?
Ordinary image-to-video mainly uses an image and text to guide movement. Motion Control also needs a video, making it useful when your character should follow an existing performance. Use the regular video generator if you want to invent an action from text without a reference performance.
References & useful links
- Open Kling Motion Control
Add your character and motion clip, choose settings and review the current credit estimate.
- Need a character image? Create one first
Match your image's half-body or full-body framing to the motion clip before adding movement.
Put the next step into practice
Prepare a half-body character image and about five seconds of movement, then follow the settings above for your first attempt.
Make your first motion video